
A Much Loved MGB in Need of a New Beginning
1. More Than Just an MGB
Some restoration projects begin with a neglected car found in a barn or a vehicle that has spent decades gradually deteriorating on British roads. Tony’s 1972 MGB Roadster came to us by a rather more unusual route — from the other side of the world.
Tony had owned the MGB for many years during his time in the UK, using and enjoying it while carrying out repairs and maintenance as required along the way. It was very much a car that had evolved with him over the years rather than something bought simply as a restoration project.
When he began looking into having the work carried out locally, the advice he received was largely to replace the original bodyshell with a new one rather than attempt to repair the extensive corrosion.
When life eventually took Tony to Australia, the MGB went with him.
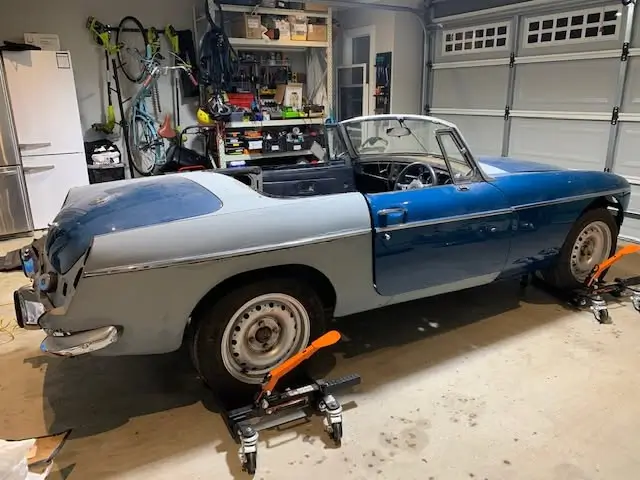
Years later, with the car sitting in his garage and now in need of a far more substantial restoration, Tony had a decision to make. As the photograph shows, there was no disguising the scale of the task ahead.
For Tony, that rather defeated the object.
A new shell might have produced a structurally sound and beautifully restored MGB, but it would not have been the same body he had owned, driven, repaired and taken halfway around the world with him. The history and identity of the original car mattered, and Tony was determined that his MGB should be repaired, not replaced.
The challenge was finding somebody with the experience — and the willingness — to take on such extensive structural reconstruction.
Australia’s generally warmer and drier climate means that the kind of severe structural corrosion routinely encountered on older British cars is considerably less common. Tony therefore began looking back towards the UK, where there is a long history of repairing and restoring cars affected by exactly this type of corrosion.
2. Heading Home for Restoration
After researching specialist restoration and vehicle welding companies in the UK, Tony chose Trickett Welding to undertake the work.
That decision meant the MGB had another considerable journey ahead of it.
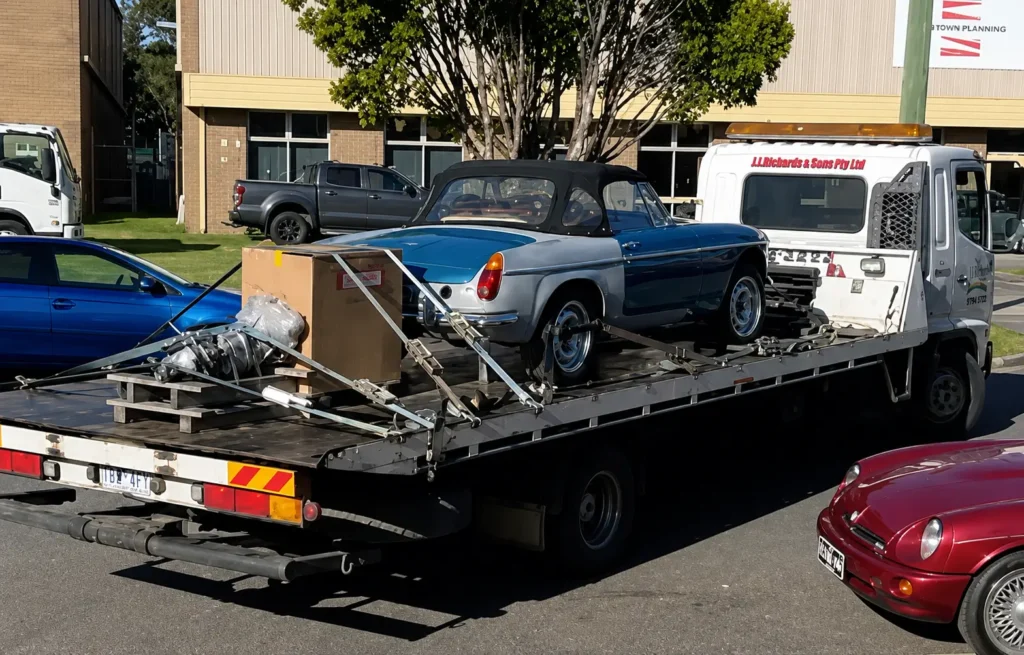
The car was loaded onto a transporter in Australia ready to begin its trip back to Britain, accompanied by its engine and a substantial collection of spare parts carefully packed into a crate.
It was an unusual sight: a dismantled 1972 MGB, thousands of miles from where it had originally lived, being prepared for shipment back to the country it had left years earlier.
But there was a very clear purpose behind the journey. Tony was determined that the original car should be saved, and rather than accepting the easier option of a replacement shell, he had chosen to send it halfway around the world to give its original body the chance of a proper restoration.
Its next stop would be our workshop in Dorset.
3. Back in Britain
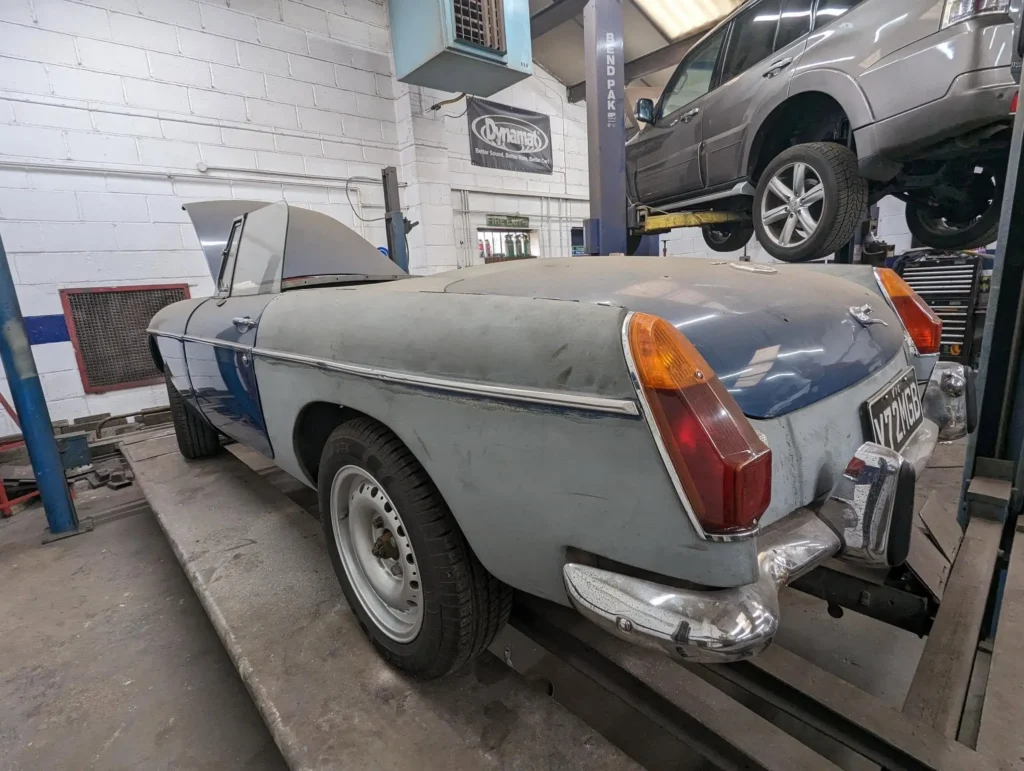
When the MGB arrived at our workshop in Dorset, its first stop was the ramp for a thorough initial assessment.
Until this point, much of the planning had inevitably been based on photographs and conversations from thousands of miles away. Now we could finally get underneath the car, inspect the structure properly and begin to establish exactly what we were dealing with.
Travelling alongside the MGB was a large crate containing its engine and a collection of components and spare parts that would eventually be needed during the rebuild.
We began opening the crate as normal, but quickly spotted something that made us reconsider — spider webs among the contents. Given where the crate had come from, we decided this was not the moment to take any chances.
The lid was promptly closed again and the entire crate was fumigated before we went any further. Australian spiders are not something we routinely encounter in a Dorset workshop, and none of us was particularly keen to discover whether anything had decided to make the journey with the car.
Once we were satisfied that there were no unexpected passengers waiting inside, the crate could finally be unpacked and its contents checked.
With the car on the ramp and everything accounted for, the assessment could begin in earnest. The next step was to strip the MGB right back and find out exactly what decades of use, corrosion and previous repairs had left beneath the surface.
4. Stripped Back to the Structure
With the initial inspection complete, dismantling could begin.
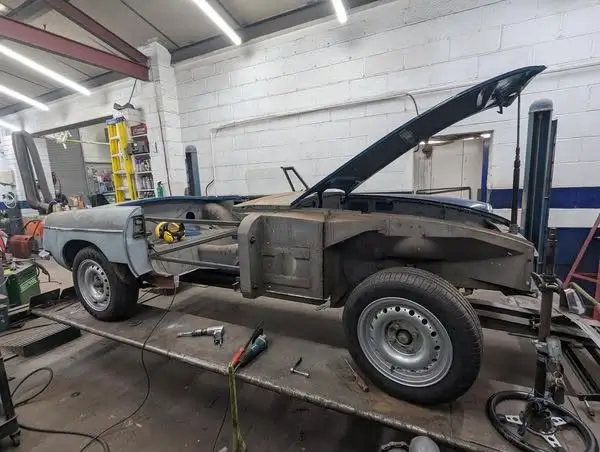
The MGB was stripped back to its bare bodyshell, removing the remaining mechanical components, trim and exterior panels so that the structure could be properly exposed. Only then could we see the full extent of what would need to be repaired.
Before cutting away any load-bearing sections, however, the shell first had to be stabilised.
Steel braces were welded securely across the body to hold everything in its correct position. On a monocoque car such as the MGB, removing weakened sills, floors and other structural sections without first supporting the shell can allow it to flex or distort, potentially creating problems with alignment later in the rebuild.
With the bracing in place, the exterior panels could then be removed and the restoration could begin in earnest.
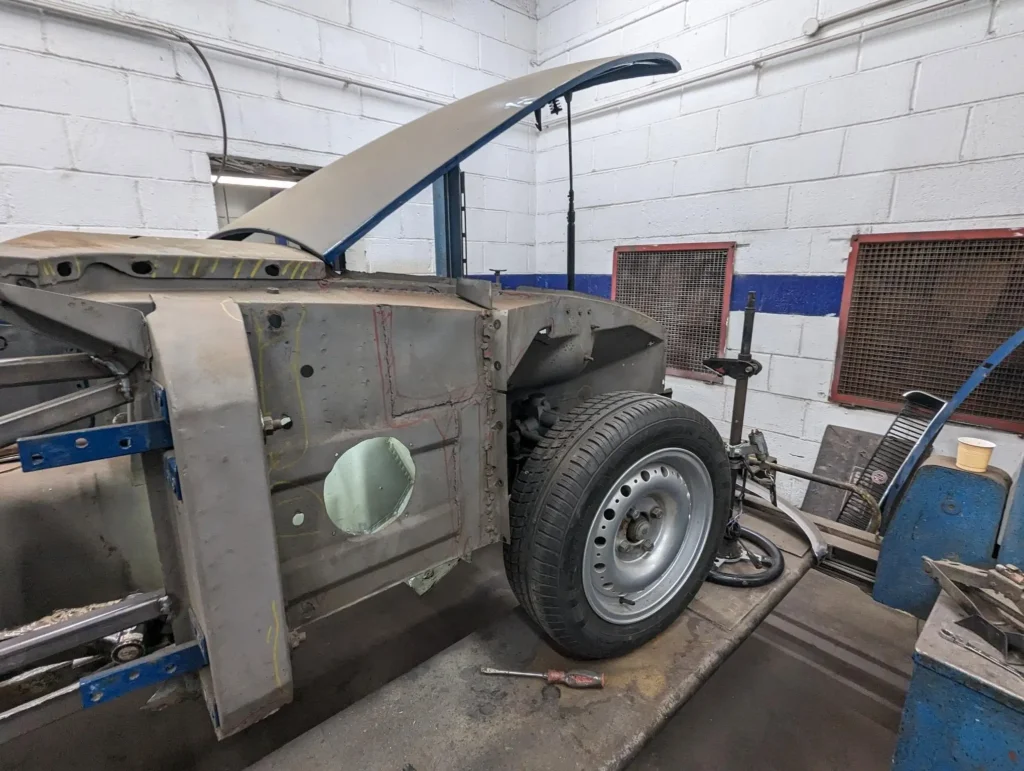
At this point there was no hiding what lay beneath. Years of corrosion were now fully exposed — but, as we began looking more closely, rust was not going to be the only thing we had to deal with.
5. What Lay Beneath
Once the outer panels were removed and the structure fully exposed, it became clear that corrosion was only part of the story.
The MGB had been repaired in a number of areas during its earlier life. Some of those repairs had no doubt kept the car usable and on the road, but they had been carried out with practicality rather than restoration quality in mind.
We found untidy welds, overlapping sections and areas where new metal had simply been added over old. Although some of this work may have been effective at the time, it was not a standard we were prepared to build the rest of the restoration around.
Where necessary, these previous repairs were removed completely, allowing us to take the structure back to sound metal before rebuilding the affected areas properly.
This inevitably increased the amount of work involved, but it was an important part of doing the job correctly. There would be little point in creating beautifully finished exterior panels if poor workmanship remained hidden underneath.
With the previous repairs cut away and the true condition of the shell now visible, we could begin rebuilding the MGB methodically from the structure outwards.
6. Rebuilding the Bodyshell
With the poor previous repairs removed and the structure taken back to sound metal, the painstaking process of rebuilding could begin.
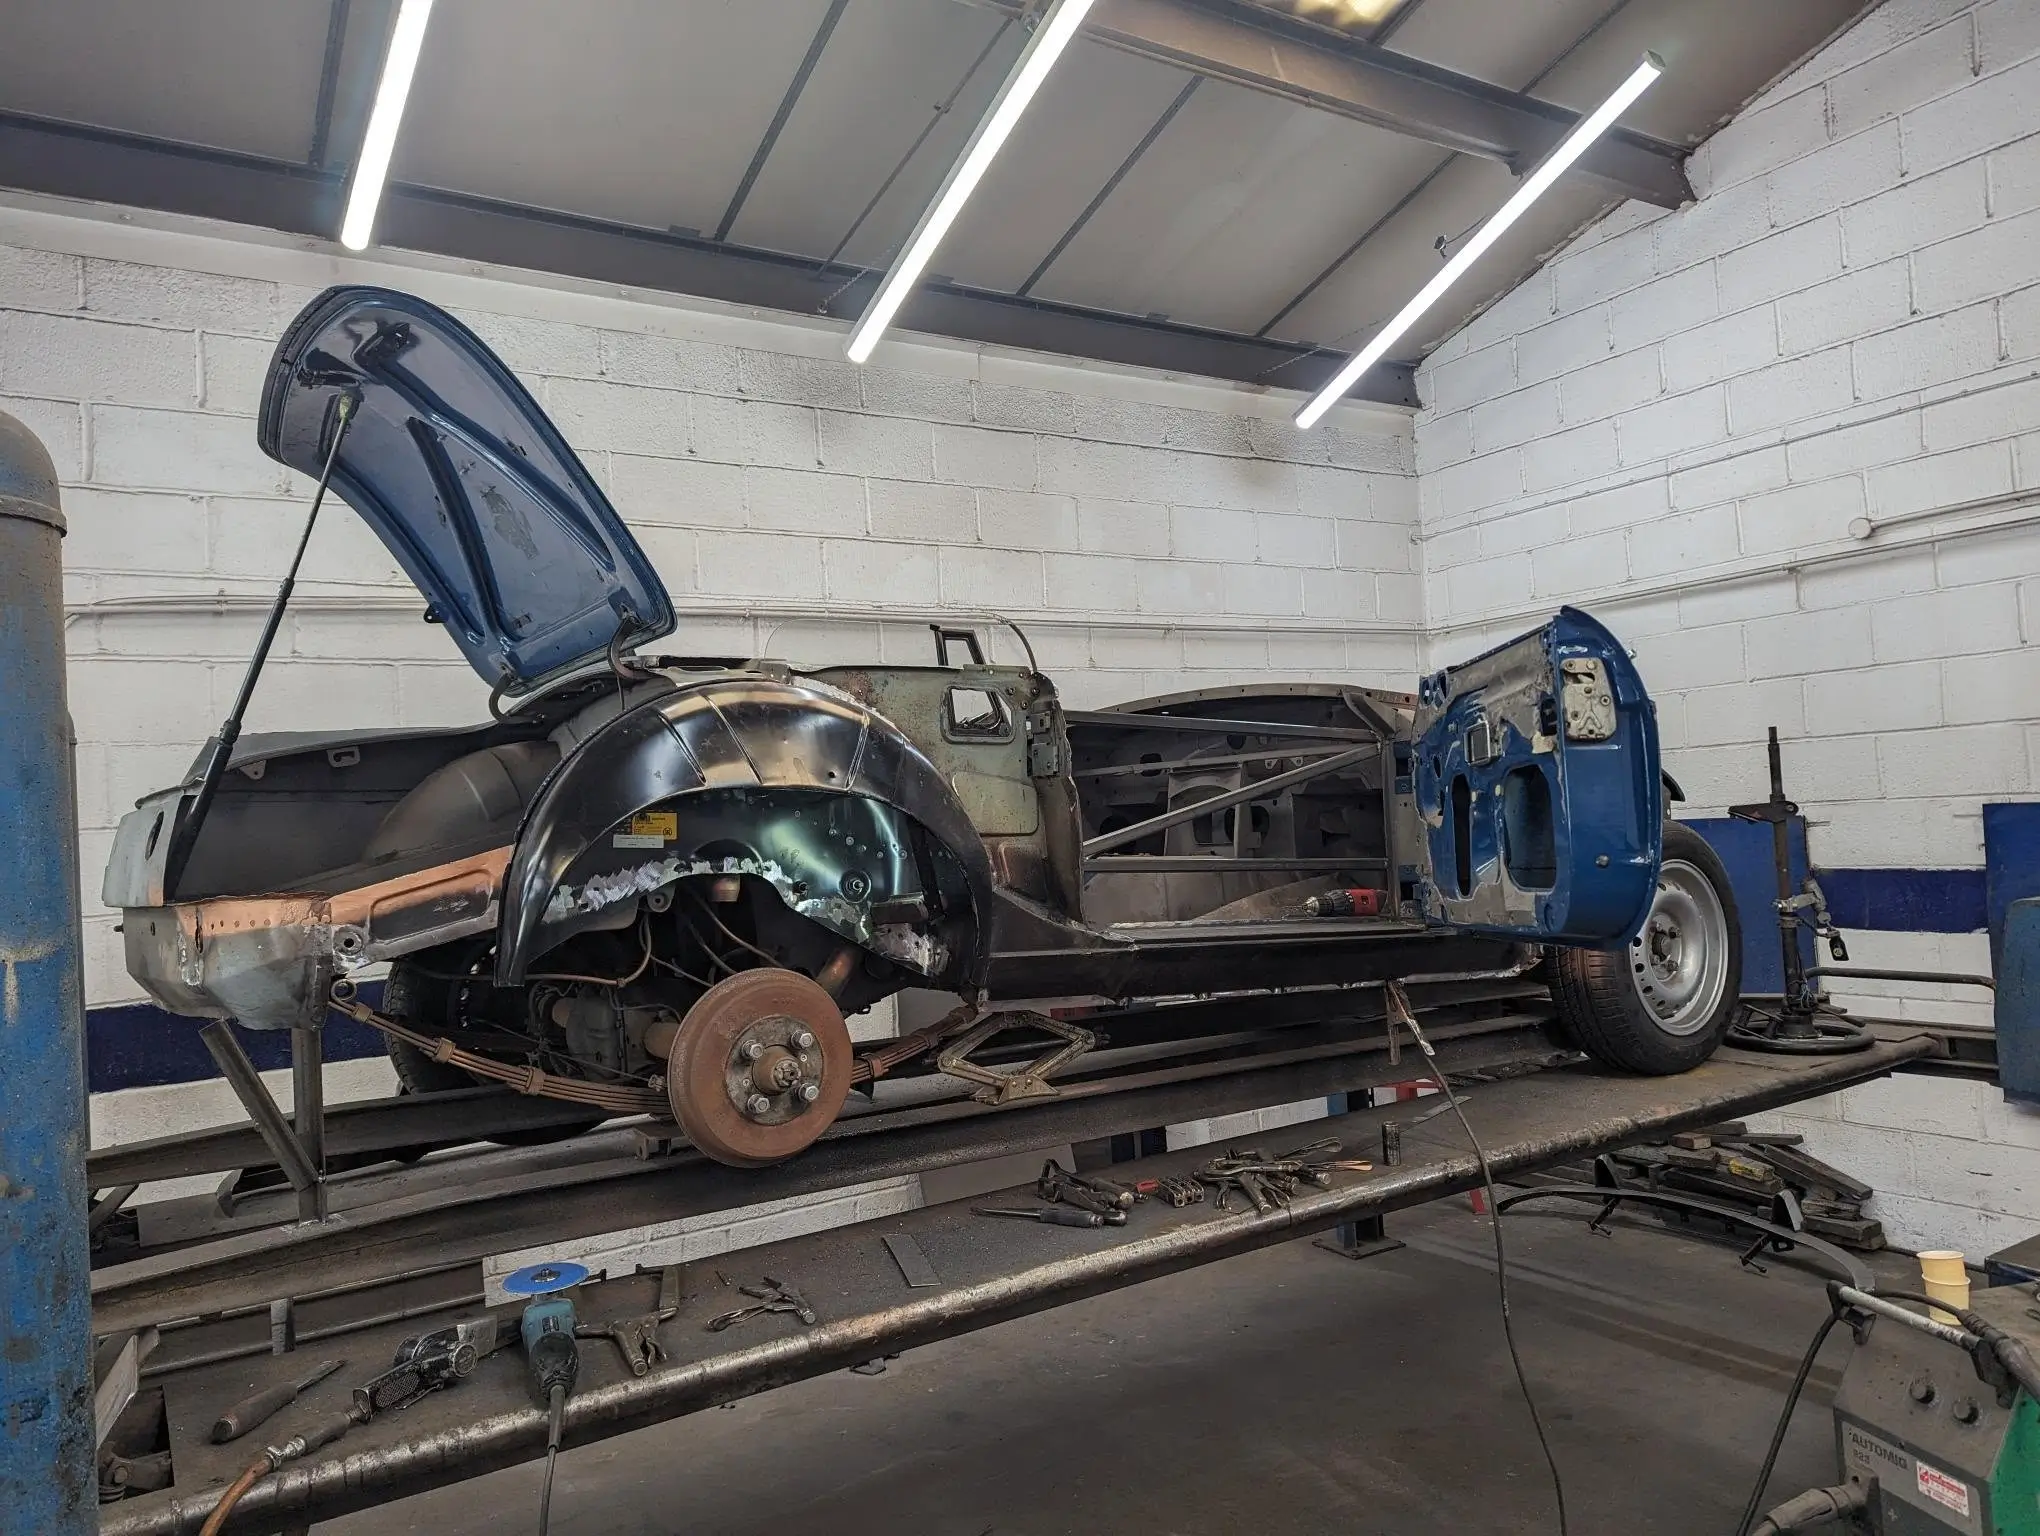
Where original sections were still viable, they were carefully repaired and retained. But in areas where corrosion had gone too far, or where earlier work had compromised the metal beyond sensible repair, replacement was the only proper option.
For those sections we sourced genuine Heritage panels, giving us the best possible starting point in terms of shape, dimensions and fit.
Even then, replacement panels are not simply fitted and forgotten. Each one had to be offered up, checked against the surrounding original structure and adjusted where necessary before being permanently installed.
The photograph shows the MGB part-way through this process, with repaired original sections and new panels gradually coming together to recreate a sound, complete shell.
This stage was very much about rebuilding the car from the inside out. The priority was not appearance yet, but strength, accuracy and getting the underlying structure right.
Once that foundation was complete, we could move on to something altogether more visible: making sure the new panels fitted the old car as though they had always belonged there.
7. Making Old and New Work Together
With the structure now sound, attention could turn to the exterior panels.
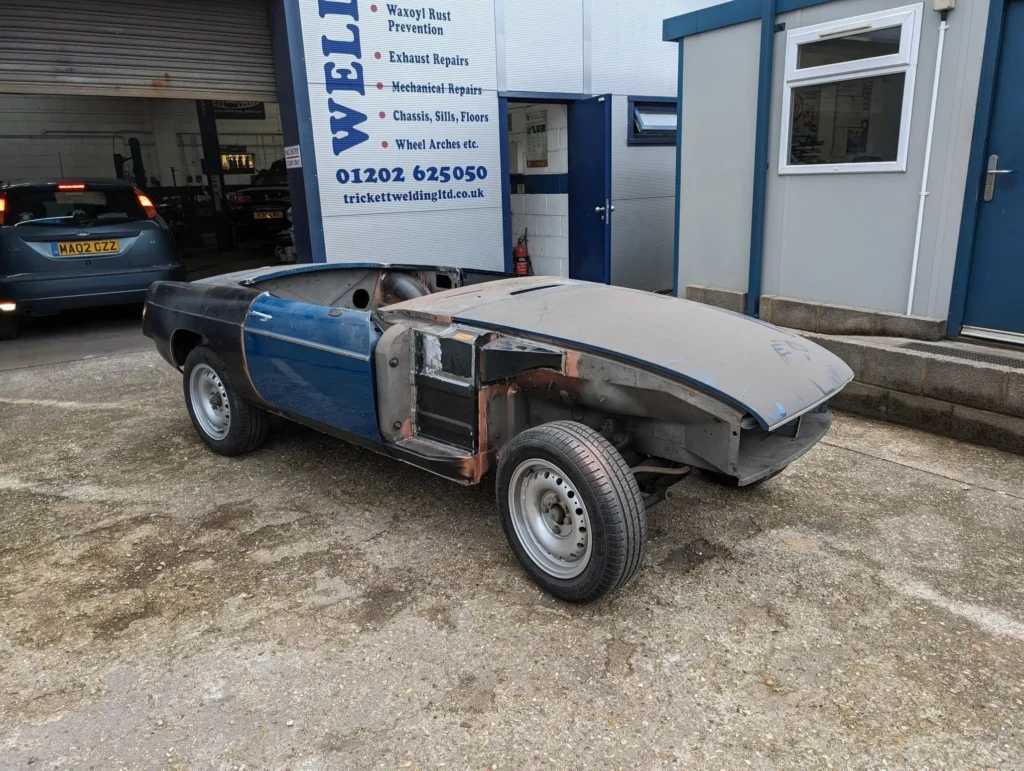
The new panels were carefully test-fitted, removed, adjusted and refitted as many times as necessary while we checked the door gaps, shut lines and overall alignment of the body.
This was particularly important where new Heritage panels met original 1972 metal. Even good-quality replacement panels rarely fit perfectly straight out of the box, and the original shell itself was never built to the sort of tolerances we would expect today.
British production cars of the early 1970s were not known for flawless panel fit, so simply reproducing the factory standard was not the goal. We wanted the finished car to be better than that.
The aim was to make the old and new sections work together seamlessly, with consistent gaps, clean lines and a balanced appearance from one side of the car to the other.
Only once we were satisfied with the fit and alignment could the panels be finalised and the body move on to the next stage: protecting the newly restored metal and beginning the preparation for paint.
8. Sealed, Protected and Shaped
With the panel fit finalised, the focus shifted from reconstruction to preservation and surface finish.
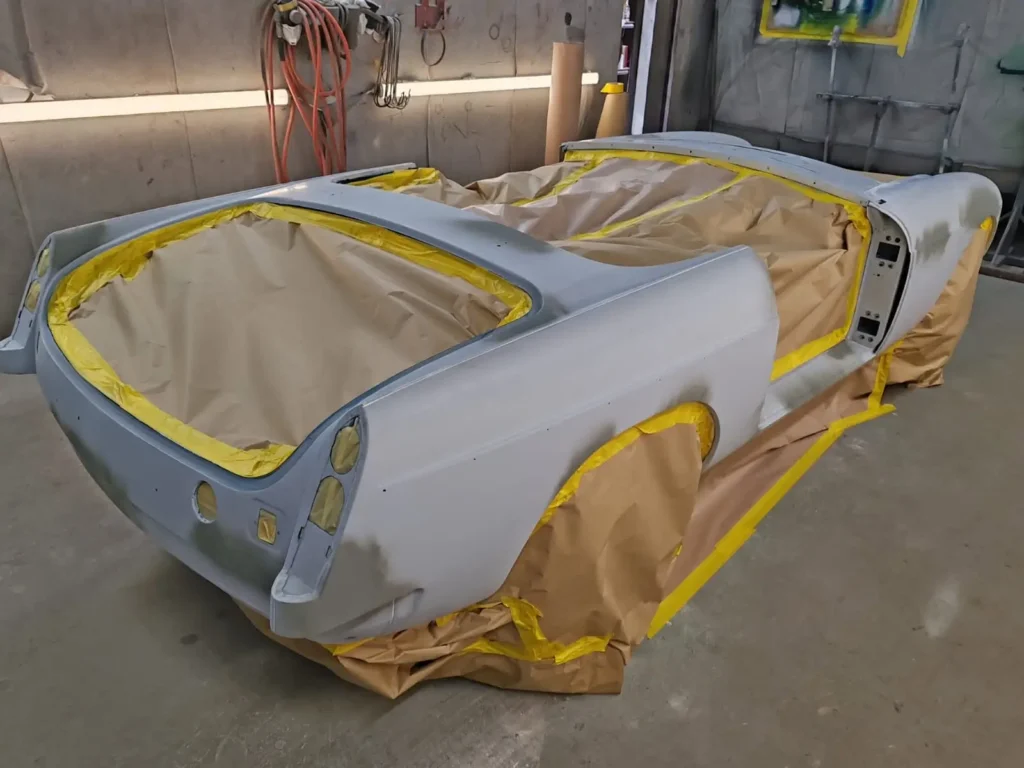
The restored bodyshell was first coated in epoxy primer. This gave the newly repaired and exposed metal a durable protective barrier against moisture and corrosion, while also providing a stable foundation for the preparation materials that would follow.
After so much time had gone into removing rust and rebuilding the shell properly, it was important that the fresh metal was sealed as early as possible rather than left exposed during the next stages of the restoration.
Once protected, the finer bodywork could begin.
Small imperfections were corrected with careful filler work, allowing us to refine the contours of the panels and smooth the transitions between original metal and replacement sections. The purpose here was not to disguise poor fabrication, but to perfect the final shape over a structure that had already been repaired correctly underneath.
The body was then carefully blocked and shaped, working through the panels until the lines and curves were consistent from one section to the next.
By this stage, the evidence of the extensive welding and reconstruction was beginning to disappear. The MGB was no longer simply a repaired shell; it was starting to regain the clean, crisp form it would carry into paint.
9. Preparing for Colour
With the body shape now established, the next stage was all about creating the surface that the final paint would sit on.
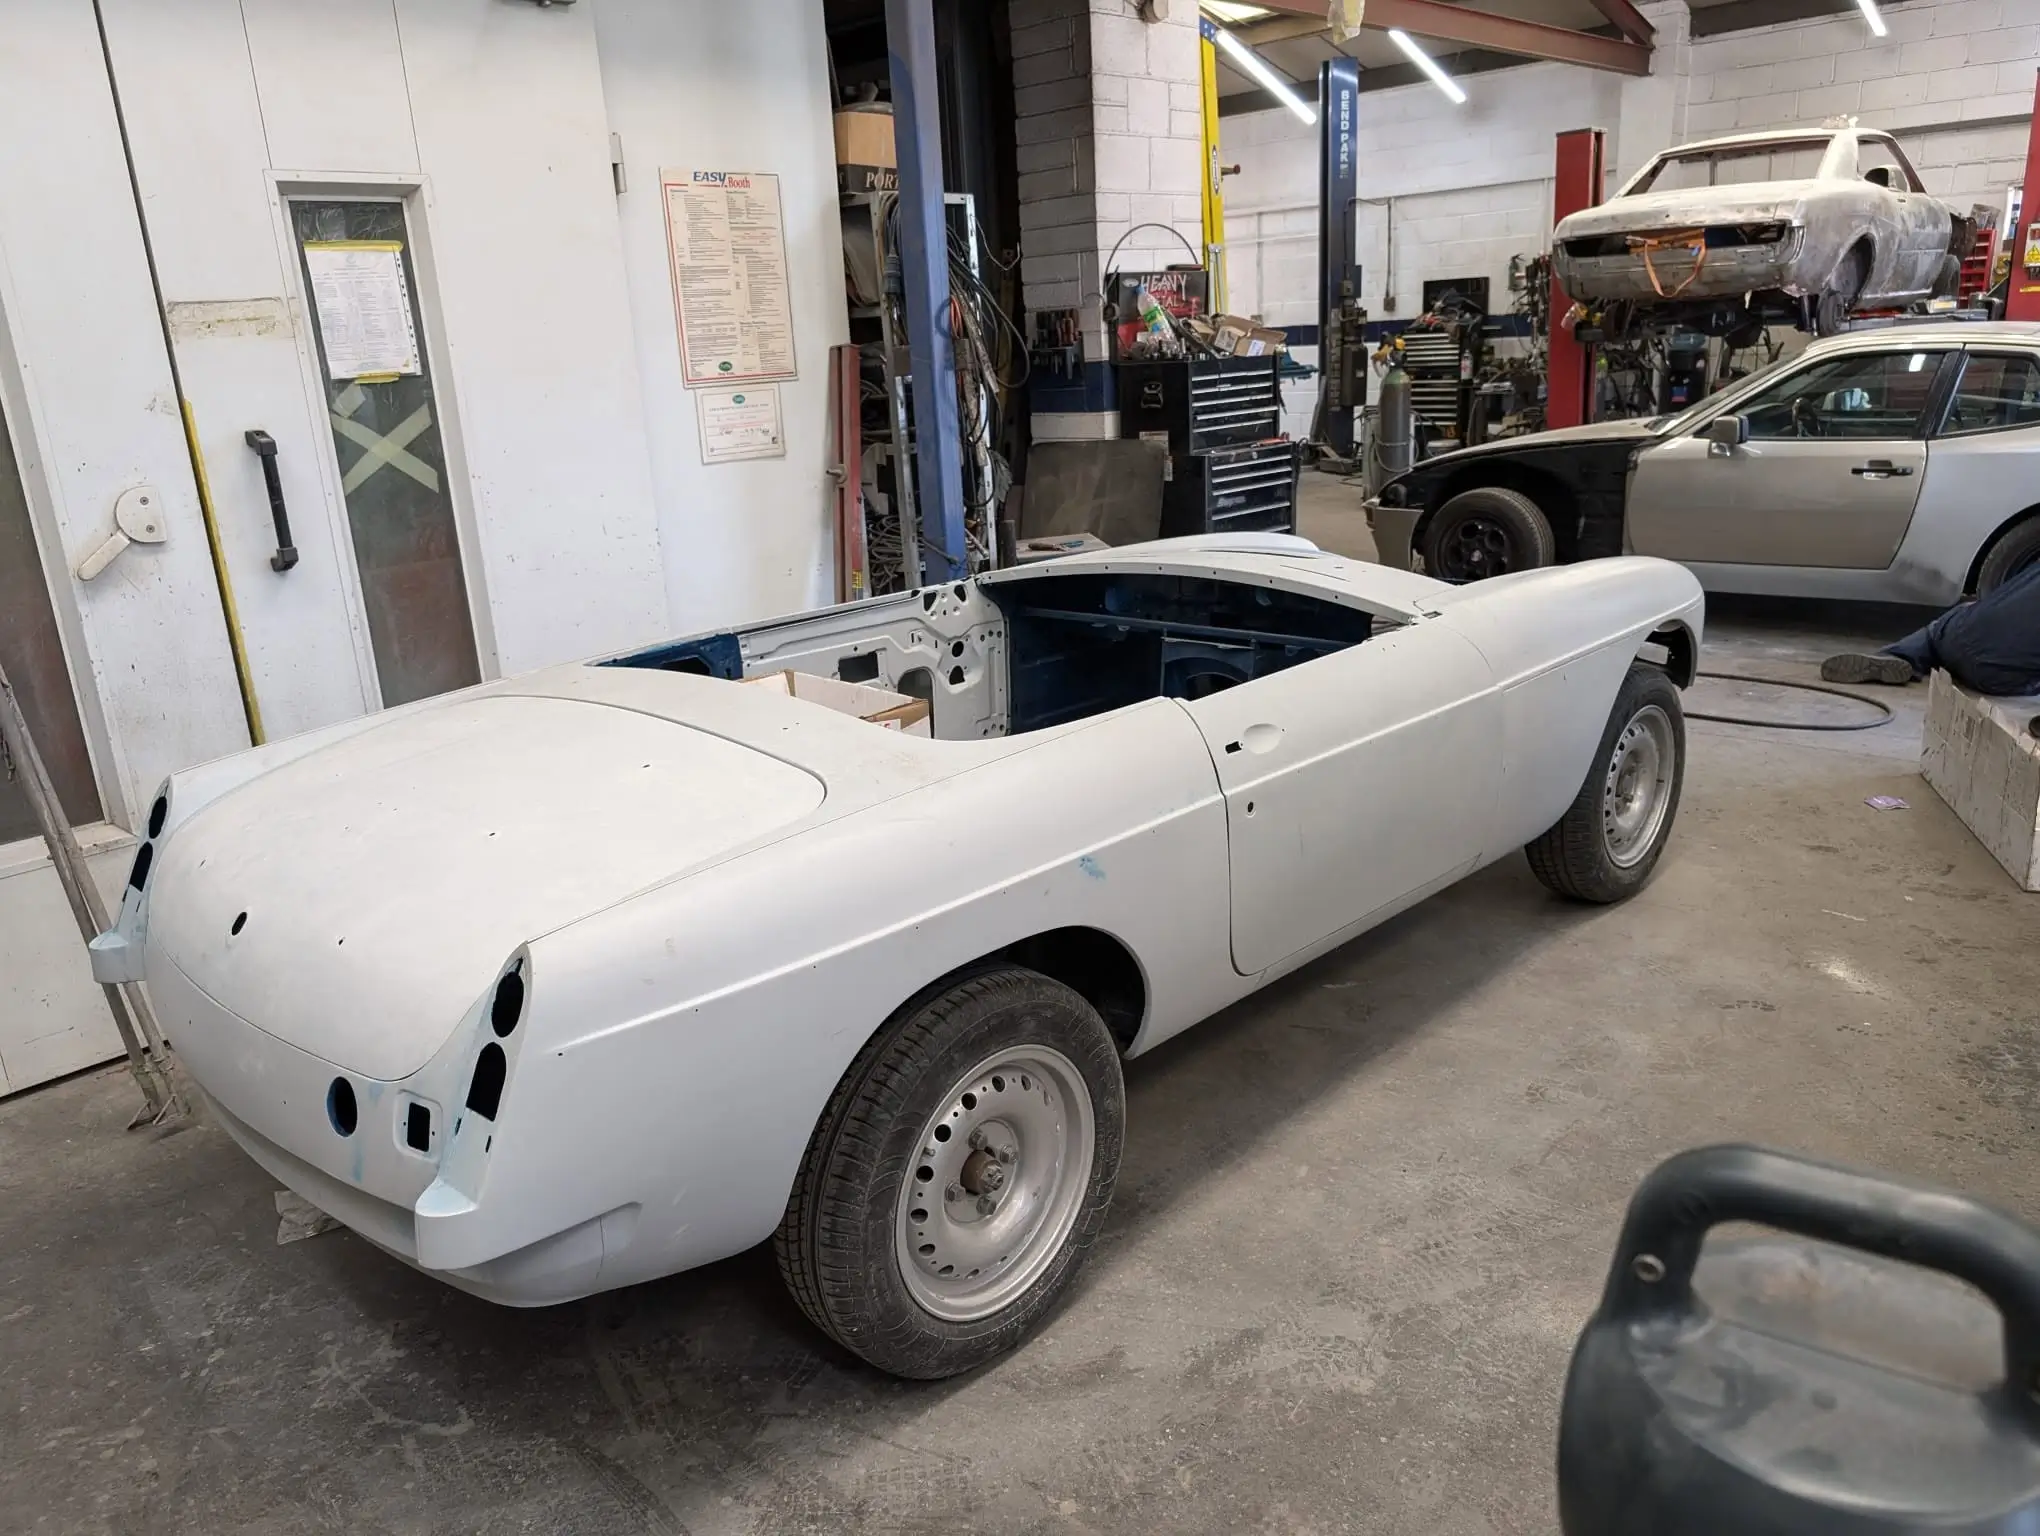
The MGB was coated in high-build primer, both inside and out. Unlike the epoxy layer beneath it, which was there primarily to protect and seal the metal, high-build primer is designed to be worked back and refined.
Once fully cured, the shell was wet-flatted by hand. This allowed us to level the surface, remove the final minor imperfections and highlight anything that still needed attention before the car went anywhere near its top coat.
It is a slow and painstaking process, but also one of the most important stages in achieving a high-quality finish. Paint will only ever be as good as the preparation beneath it, so there was no room for shortcuts.
By the end of this stage, the shell had a smooth, uniform surface throughout and the body lines were exactly where we wanted them.
The fabrication and major bodywork were now behind us. The MGB was finally ready for colour.
10. The Areas You Don’t See
With the preparation complete, colour could finally begin to go onto the car.
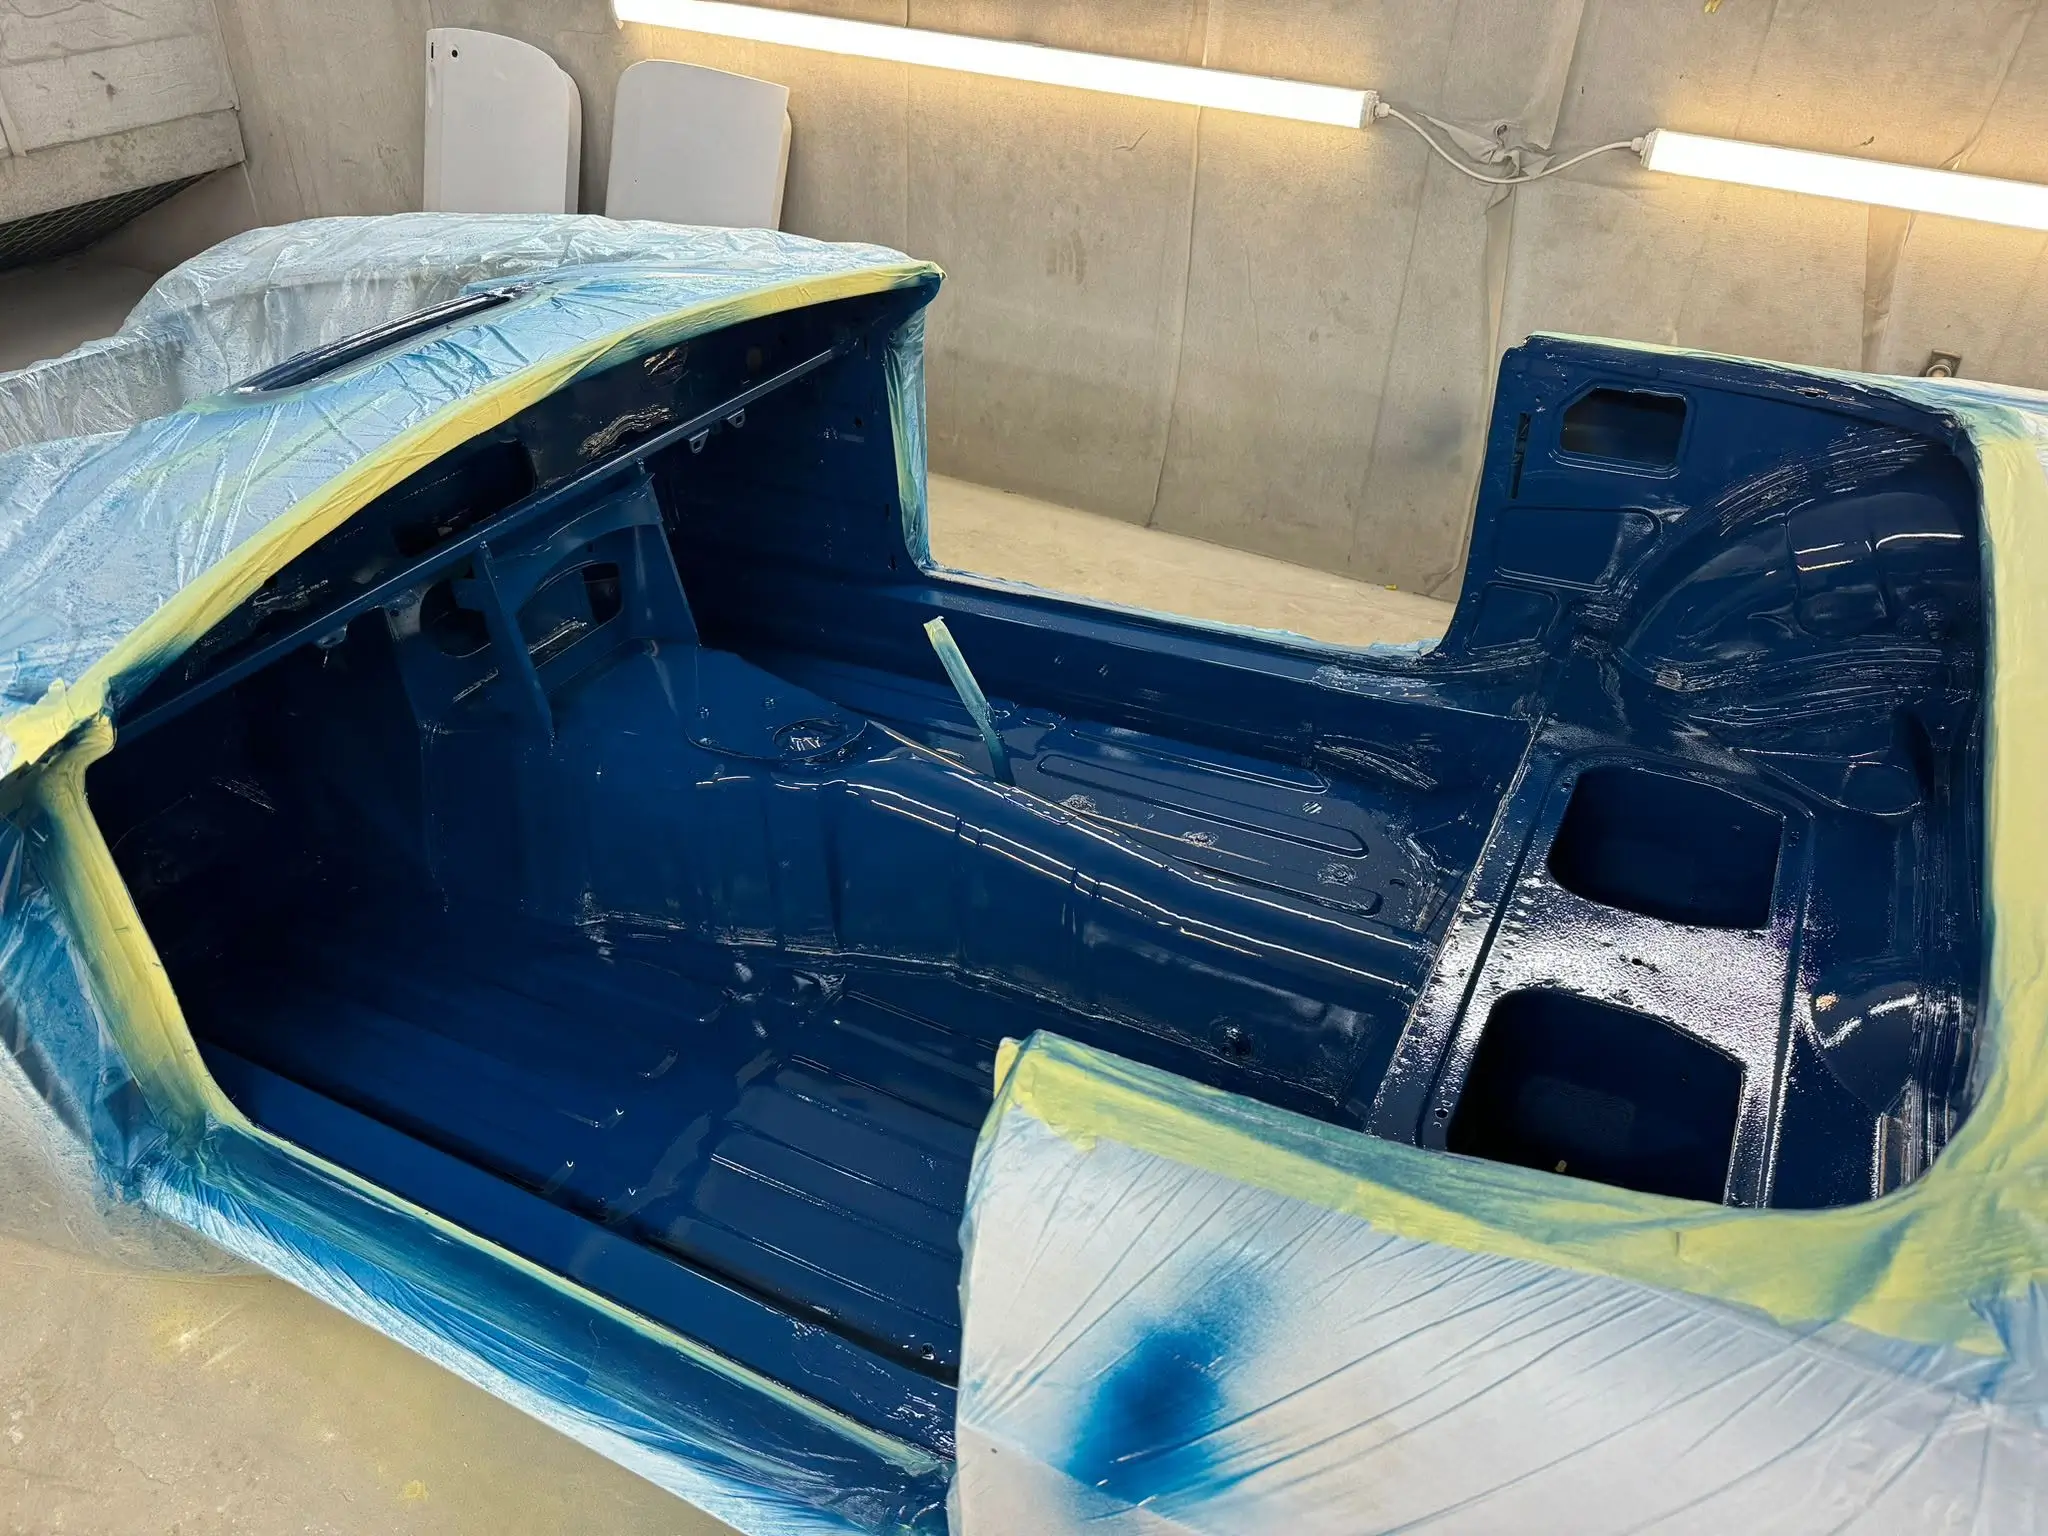
The first areas to receive the original Teal Blue were the interior of the bodyshell and the sections that would eventually disappear beneath carpets, trim panels, seats and other fittings.
Much of this work would never be visible once the MGB was finished, but that was no reason to accept a lower standard. The floors, inner panels, seams and repaired sections were all prepared and painted with the same care as the exterior.
This was particularly important because the interior restoration itself was not part of our work. Once the bodyshell left us, other specialists would be fitting the trim, and these were the areas they would see before anything was covered up.
For us, that matters. A restoration represents the quality of our workmanship whether the finished surface is on permanent display or eventually hidden beneath a carpet. The customer, trimmers and anyone working on the car in years to come should find the same standard wherever they look.
With the less visible areas finished properly, attention could now turn to the part everyone would see — getting the exterior back into its original Teal Blue.
11. Back Into Teal Blue
With the interior and hidden areas completed, it was time for the transformation everyone had been waiting for.
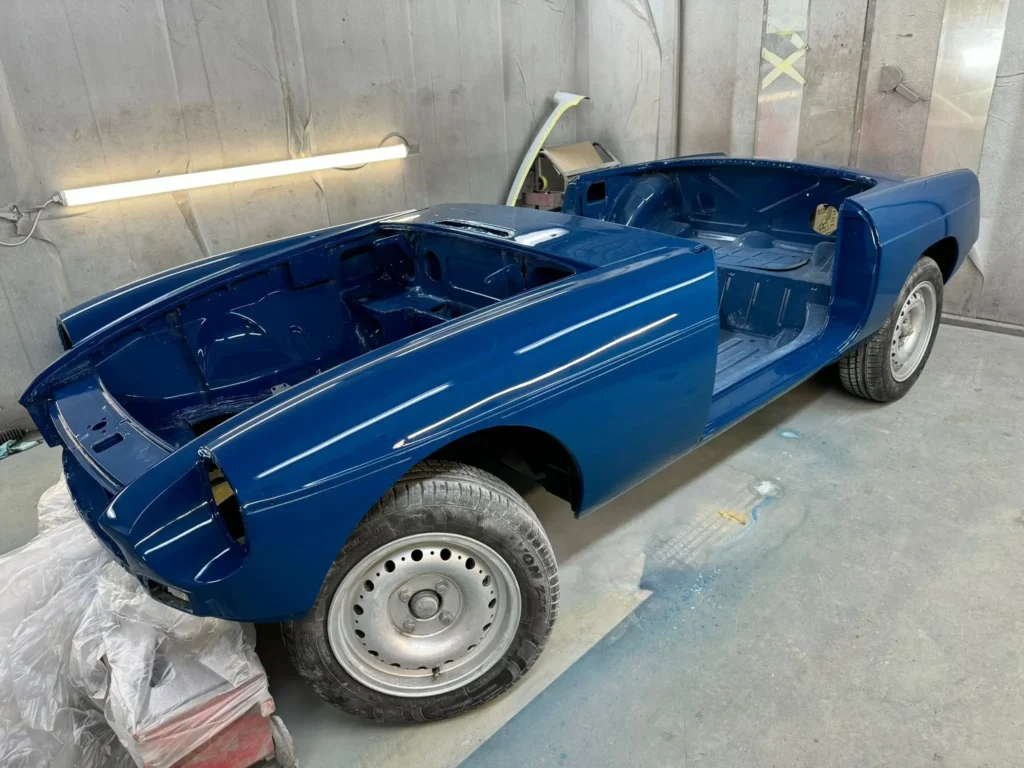
The exterior was returned to its original Teal Blue, bringing back an important part of the car’s identity and, for the first time, allowing the quality of all the preceding metalwork and preparation to be seen as a whole.
Tony had also decided that the finished car should have a slightly more sporting character. Rather than refitting the conventional chrome bumpers, he chose Sebring-style front and rear bodywork, inspired by the competition MGB and MGC models raced by the BMC works team at the 12 Hours of Sebring during the 1960s.
The replacement sections were fibreglass, which meant they required considerably more work than simply being bolted into place. Each piece had to be trial-fitted, shaped and adjusted so that it followed the contours of the restored steel body correctly.
Particular attention was paid to the transitions between the original body and the new Sebring panels. The finished conversion needed to look like part of the car rather than an accessory added afterwards.
Once everything had been prepared and painted together, the result was a much more purposeful interpretation of the familiar MGB shape, while the original Teal Blue kept a strong link to the car Tony had owned for so many years.
12. Protecting the Underside
With the body now painted, attention turned to making sure the restoration was just as well protected underneath.
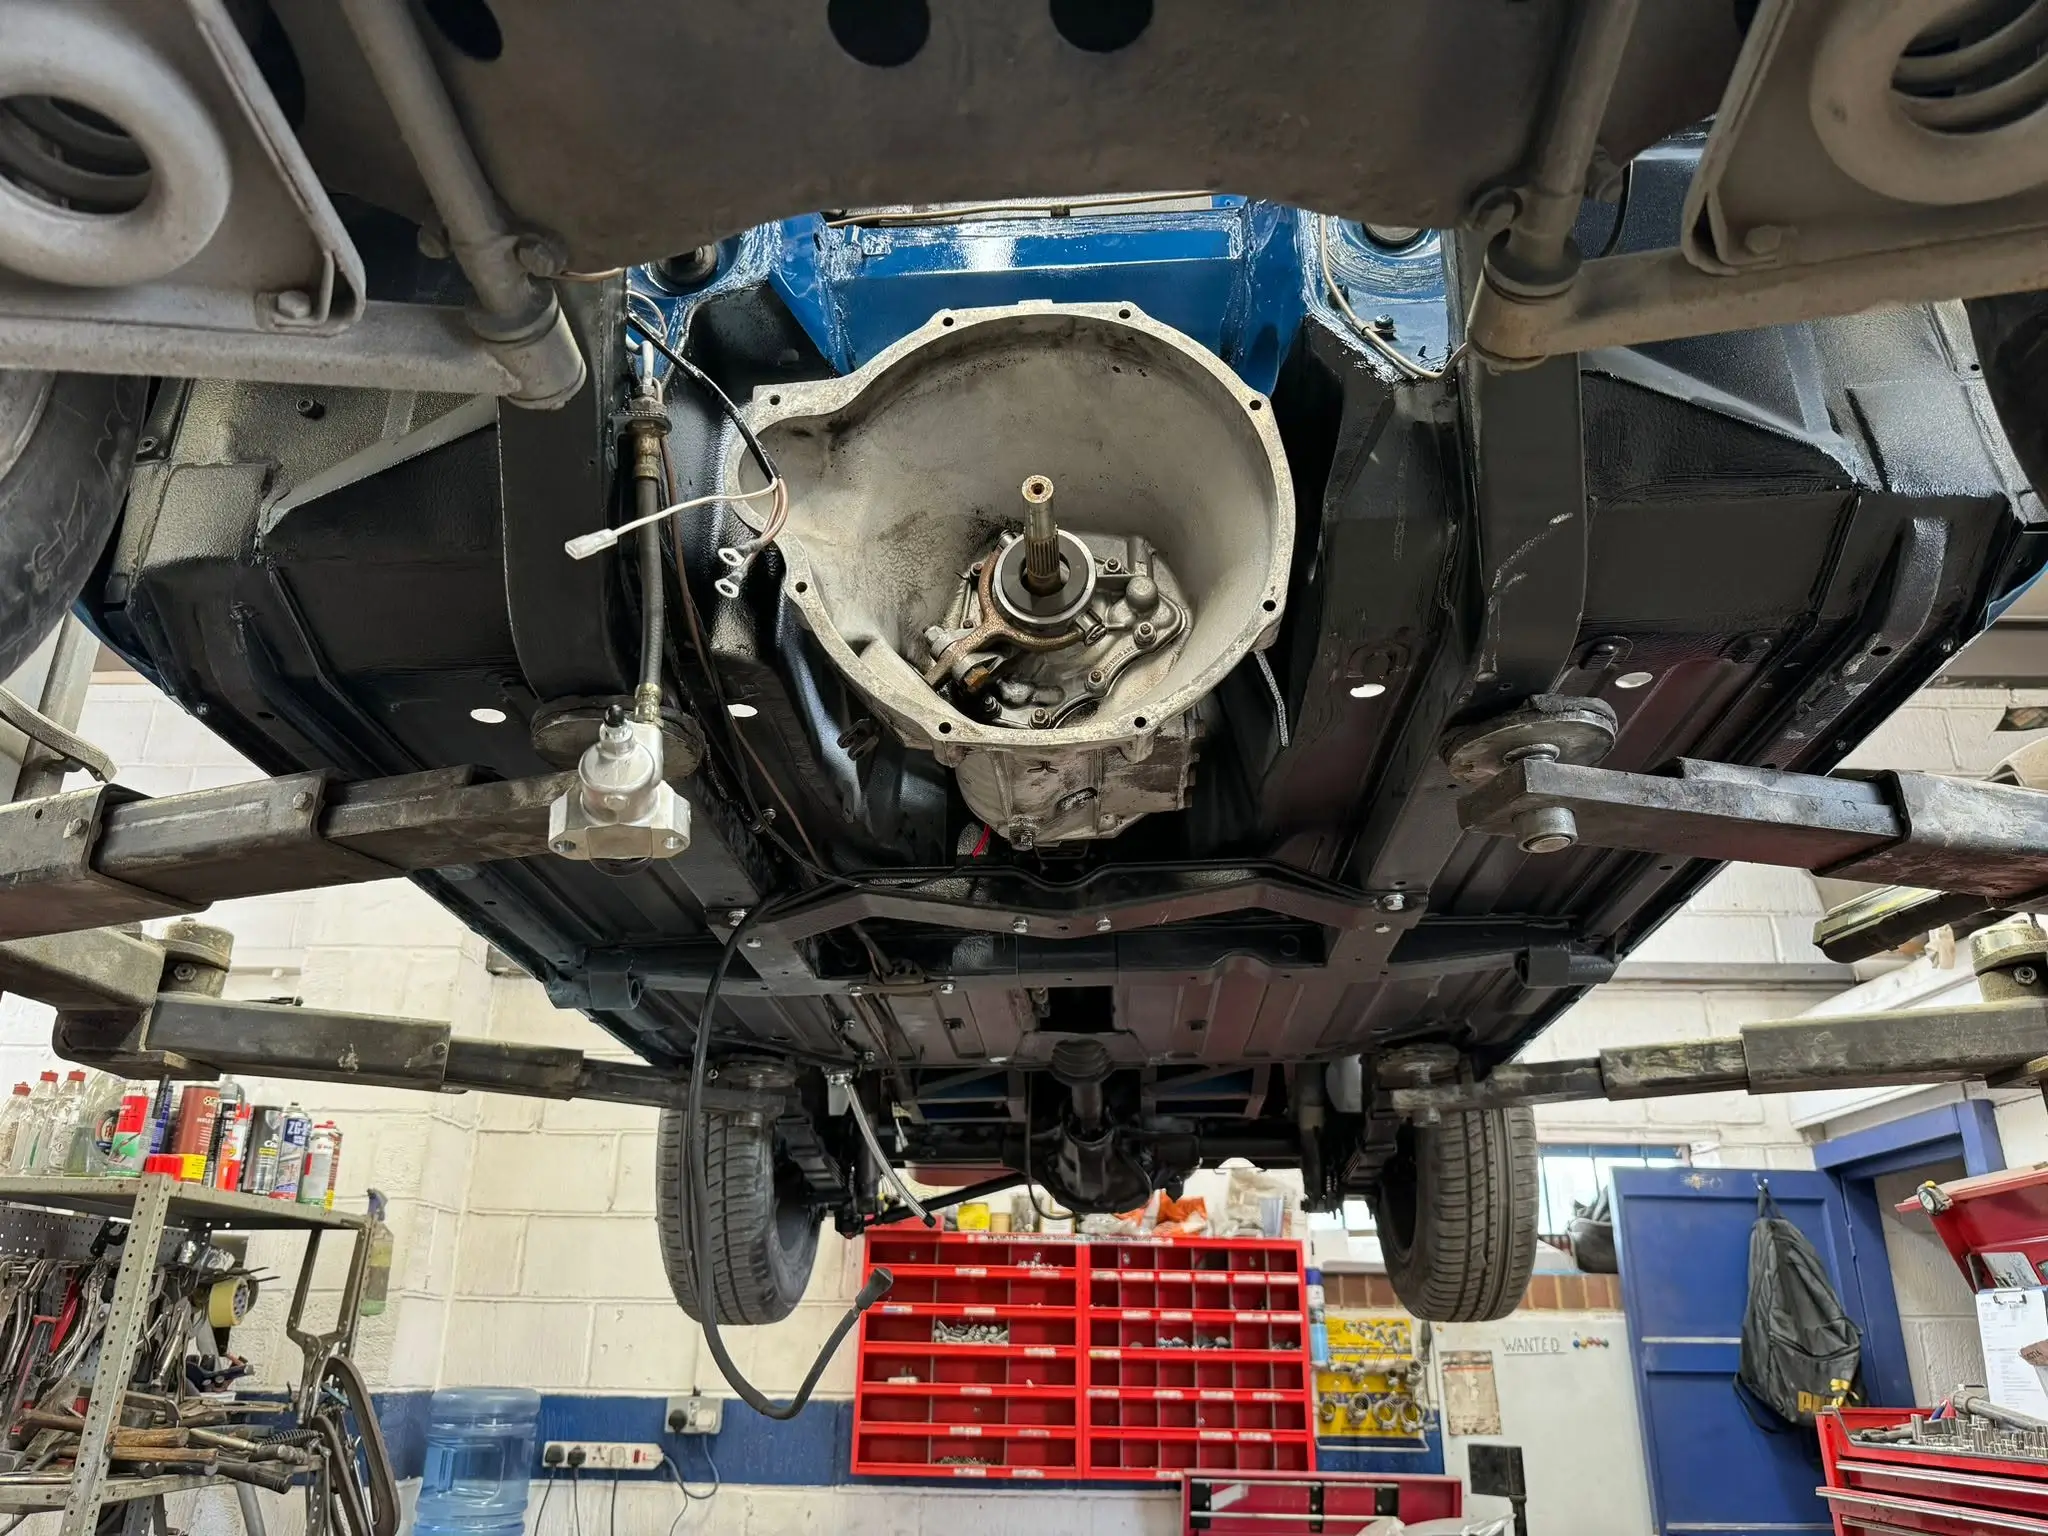
The underside was carefully prepared before receiving a durable stone-chip coating. This provides a tough barrier against road debris, moisture and the general punishment the underside of any regularly used car will inevitably receive.
There was also another important consideration throughout the rebuild: the MGB would ultimately be returning to Australia.
The brake lines therefore needed to be made from a material suitable for Australian requirements. Rather than the plain copper pipe commonly used by many UK garages, we made the new lines from cupro-nickel, giving a durable and corrosion-resistant installation while ensuring the car would be properly prepared for its return home.
It is the sort of detail that can easily be overlooked during a restoration, but on a car destined to travel halfway around the world again, every part of the build needed to be considered with its future use in mind.
With the underside protected and the new brake lines installed, the restored shell was ready for the next major phase: fitting the car back together.
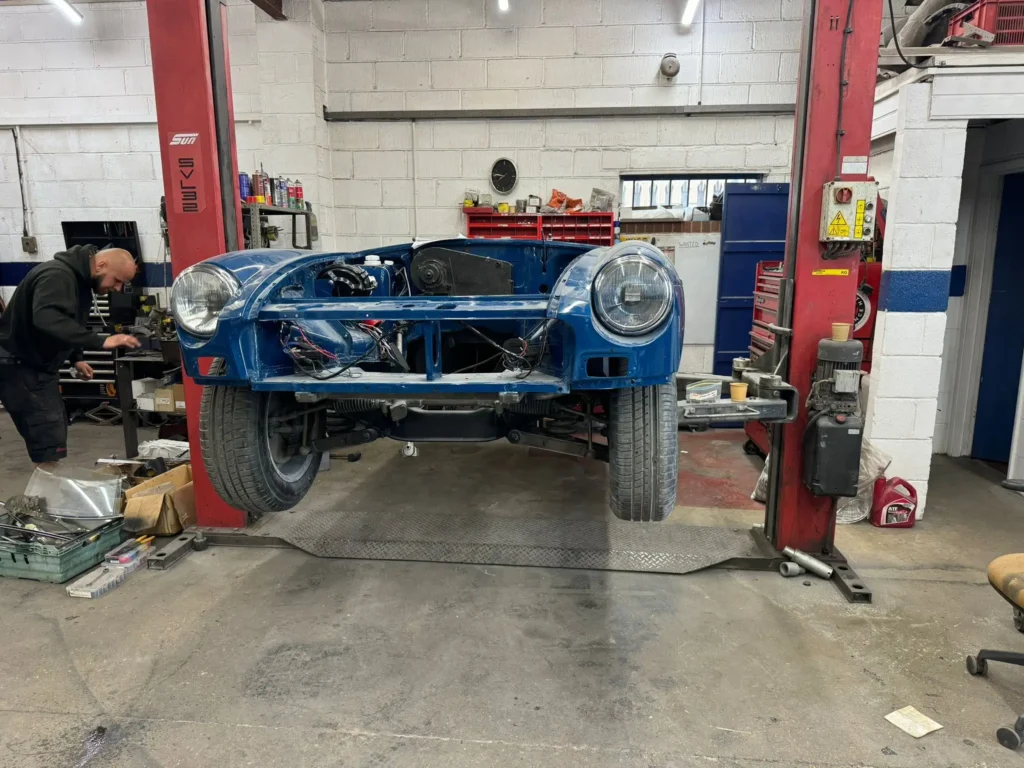
13. The Rebuild Begins
With the shell painted, protected and ready to receive its components again, the rebuild could finally get underway.
Fortunately, many of the bolt-on parts that had travelled back from Australia with the car were in very good condition. Rather than replacing them unnecessarily, we cleaned, inspected and refreshed the original components before refitting them to the restored body.
As the car went back together, we also uncovered a few interesting details about its previous specification.
One of the more significant was the braking system. At some point in its life, the MGB had been fitted with the larger brakes from an MGB GT V8, providing greater stopping capability than the standard Roadster setup. It was a worthwhile upgrade and one that made perfect sense to retain.
The rebuild then became a steady process of checking, refurbishing and reinstalling each component in turn, from the lighting and brightwork to the suspension, braking and mechanical systems.
After so much of the project had involved cutting away damaged metal and rebuilding the bodyshell from the ground up, this was a welcome change of direction. For the first time, parts were going back onto the car rather than coming off.
And one particularly important component was still waiting to be fitted — the engine that had spent years sitting in a crate.
14. Power to Match the Looks
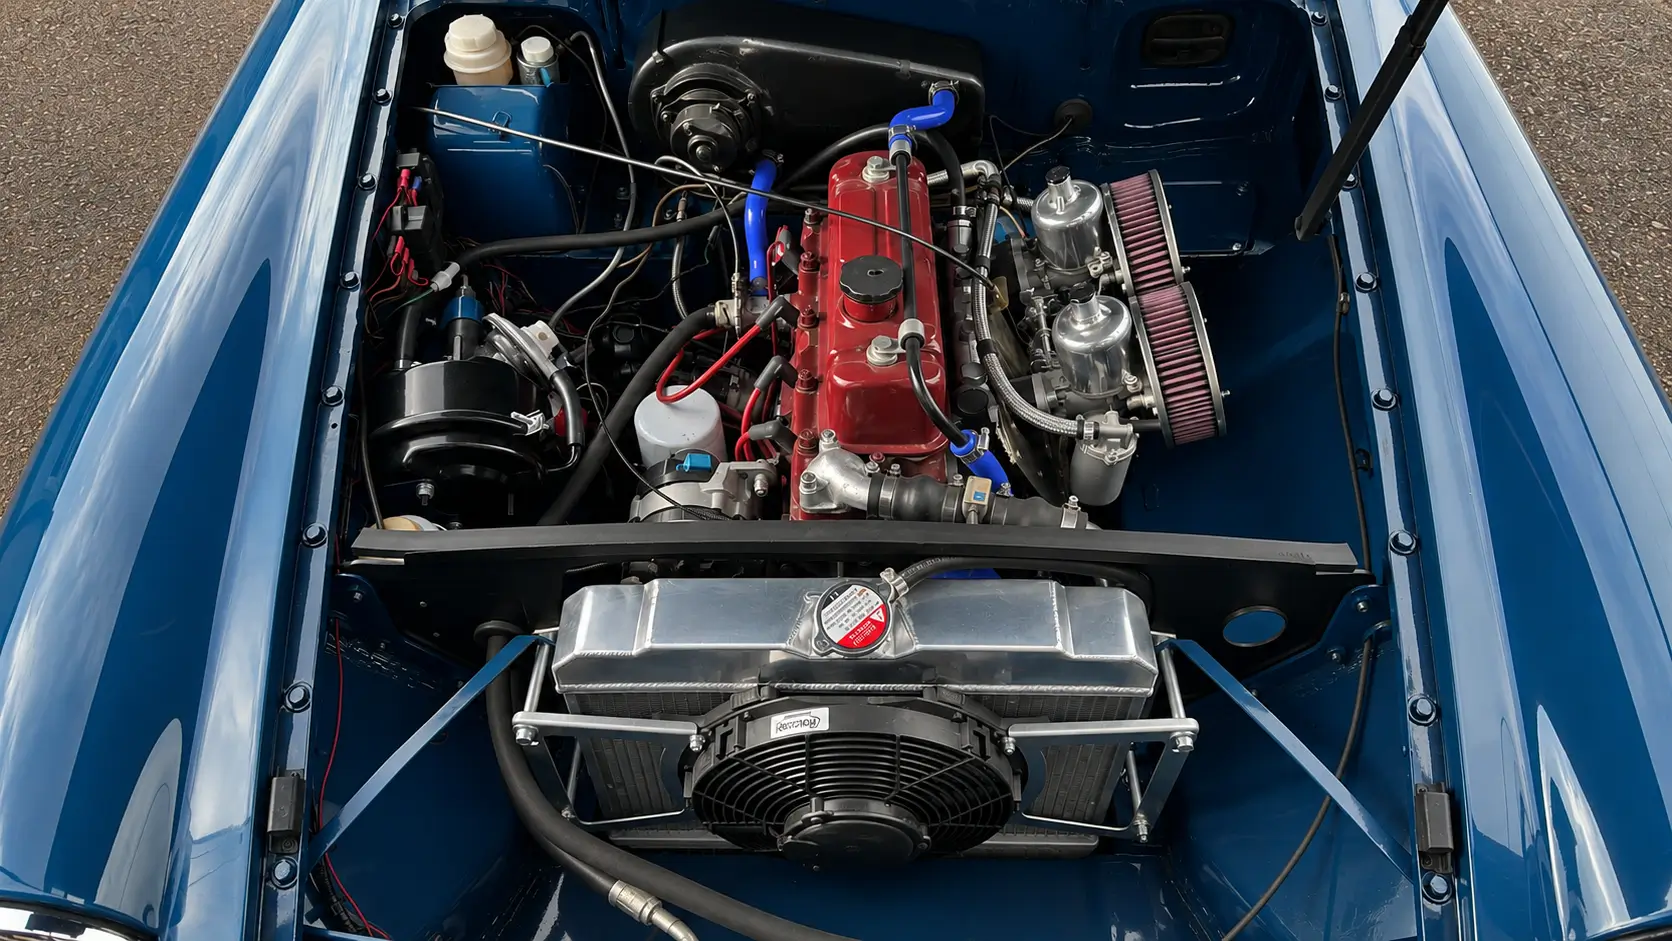
The engine waiting to go into the MGB was rather more special than the standard 1.8-litre B-Series it had originally left the factory with.
Tony had purchased an Oselli 1950cc Stage 2 lightened and balanced engine before the car was exported to Australia. It had been built and prepared for the MGB, but never actually fitted, instead spending the intervening years safely stored away in a crate.
The Oselli unit is a developed fast-road version of the familiar B-Series, designed to deliver considerably more power and torque than the standard engine while retaining the character that makes these cars so enjoyable to drive.
Before installation we fitted a new pair of SU carburettors and uprated components to the cooling system, ensuring the engine had the supporting equipment it needed and taking into account the considerably warmer climate it would ultimately be returning to.
After sitting unused for so long, it was particularly satisfying to finally lower the engine into the freshly restored Teal Blue engine bay and see it in the car it had originally been built for.
It also brought another element of Tony’s vision together. The Sebring-style bodywork had given the MGB a more purposeful appearance, and now there was a suitably uprated engine beneath the bonnet to back it up.
With the major mechanical components now in place, the car was approaching the point where all those years of planning, shipping and restoration would finally come together as a complete MGB.
15. Complete Again
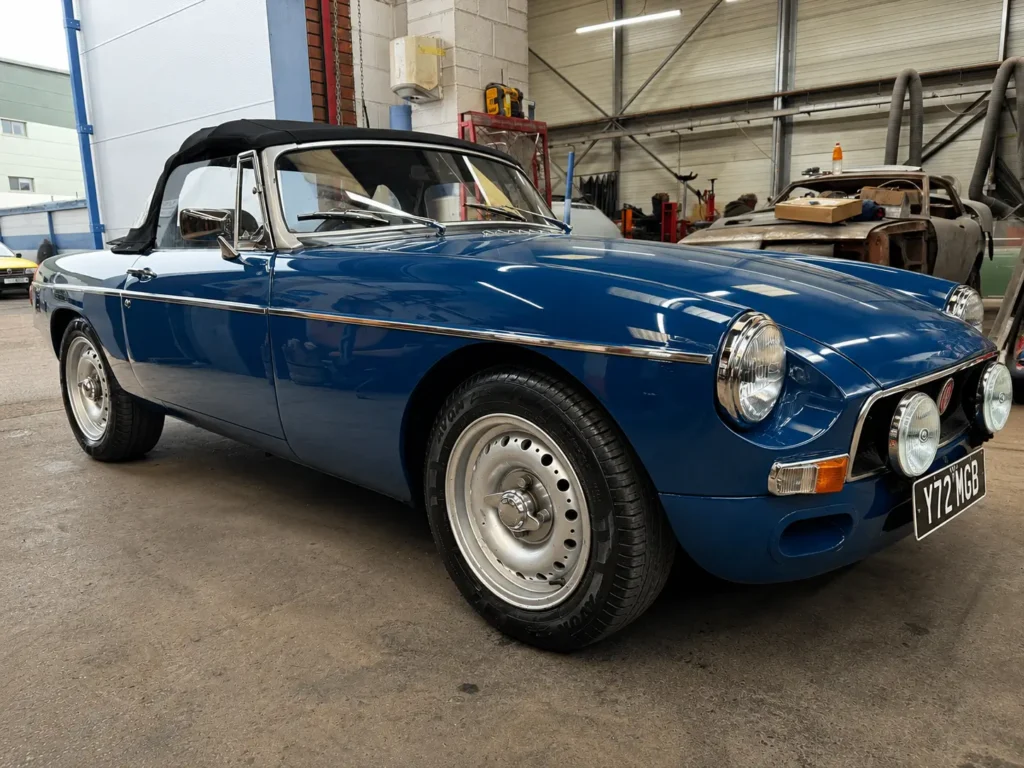
With the engine installed and the remaining mechanical work completed, the final stages of assembly could be finished and Tony’s MGB was finally a complete car again.
The lights, brightwork, trim and exterior fittings were all carefully refitted, bringing back the familiar details that had disappeared when the car was stripped to a bare shell. Against the original Teal Blue, the chrome gave the car a crisp, traditional finish, while the wider accessory steel wheels added a subtly more purposeful stance.
We also refitted the car’s original interior so that the MGB could be completed and tested as a whole. The interior itself was not being restored by us; Tony intended to have it retrimmed once the car was back in Australia, where he could oversee the choice of materials, colours and finishing details personally.
One particularly special item was retained throughout: the Moto-Lita steering wheel. It had been given to Tony many years earlier by his late grandmother and, quite understandably, carried far more significance than simply being a period accessory. It was an important part of the car’s history and something that unquestionably belonged in the finished MGB.
By this point, the transformation was complete. The tired and heavily corroded Roadster that had arrived from Australia had become a fully rebuilt car, but importantly, it was still based around the original bodyshell Tony had been so determined to preserve.
Mechanically, it was now a much more capable car too. The uprated Oselli engine, larger MGB GT V8 brakes and improved cooling system all gave it a specification that went well beyond standard without taking away the character of the original MGB.
Standing complete in the workshop, the car now looked every inch the finished restoration Tony had waited so long for.
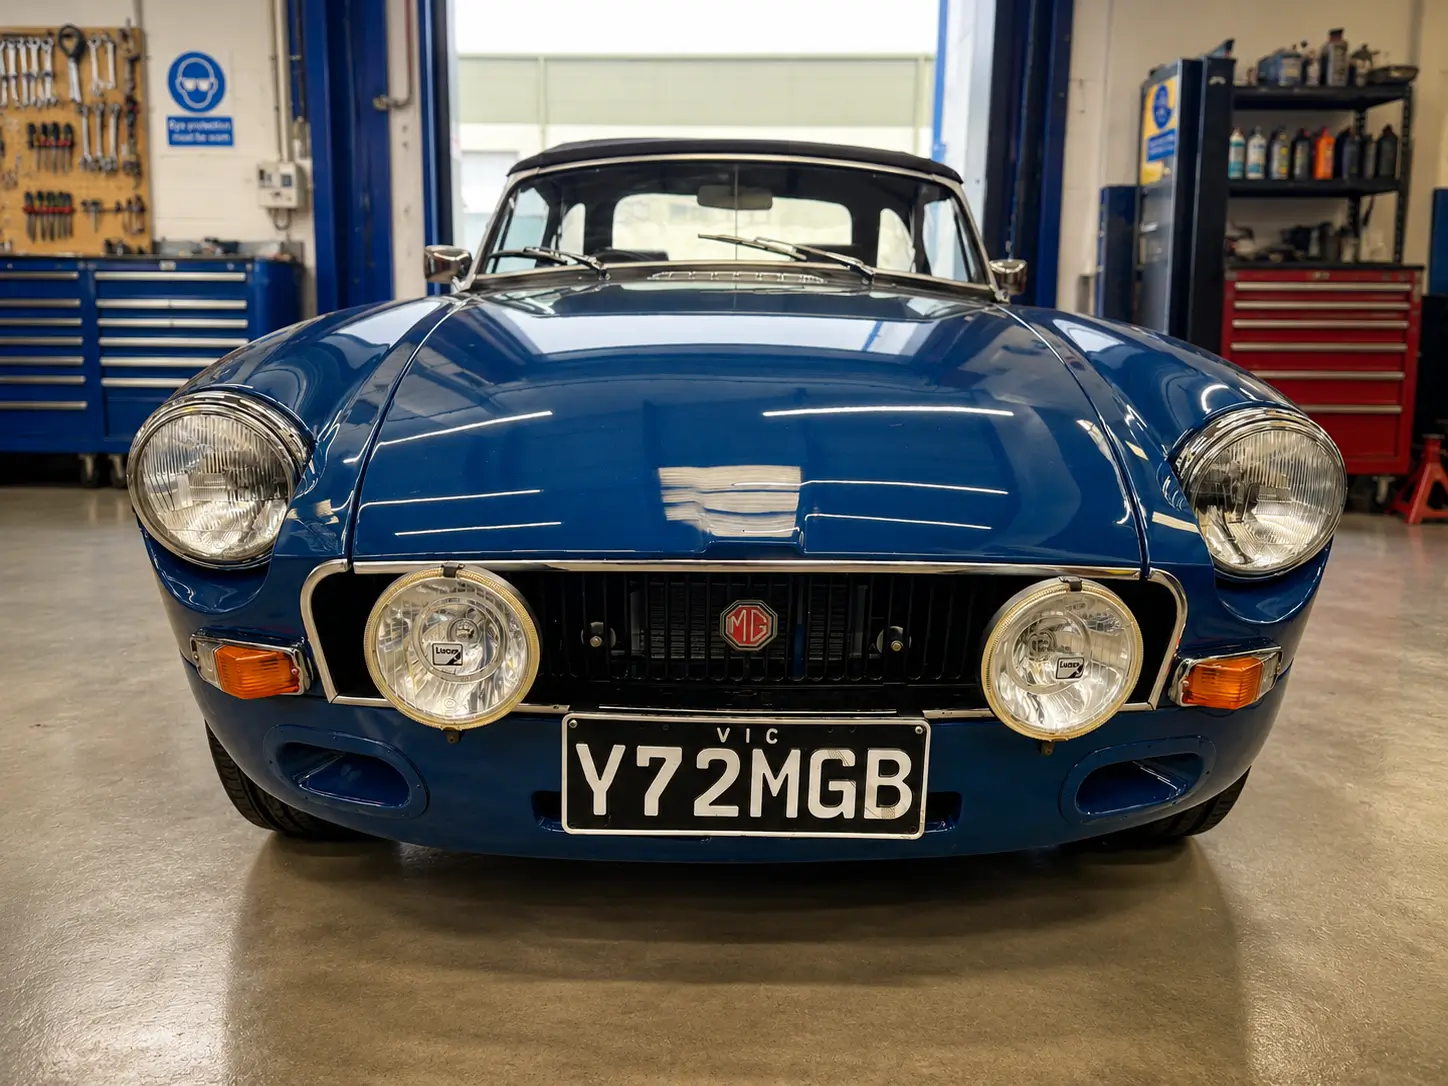
The next photograph focuses on one of the most distinctive areas of the build in its own right: the detailed treatment of the front end.
Our part of the project was now complete, but the restoration itself still had one final personal touch to come. Tony planned to have the interior trimmed in Australia to suit his own tastes, allowing him to finish the car exactly as he wanted it and put his own stamp on the final details.
16. A Closer Look at the Sebring Front
Viewed head-on, the detail of the Sebring conversion is much easier to appreciate.
The original bumper arrangement has gone, replaced by the smoother fibreglass front section, with the grille, indicators and openings all sitting neatly within the revised nose.
The pair of Lucas spot lamps add a strong period competition influence, but they also had a personal significance. They had been given to Tony as a gift from his wife, so it was important that they were incorporated into the finished car rather than simply treated as another styling detail.
This angle also shows why so much time was spent preparing and fitting the fibreglass panel before paint. The bonnet, wings, grille and lower section all have to relate correctly to one another, and any mismatch would be immediately obvious from the front.
By carefully shaping and refining the Sebring panel during the bodywork stage, we were able to make it sit naturally with the original steel body rather than appearing like an aftermarket addition.
It is a relatively simple modification in principle, but getting it to look right depends entirely on the quality of the preparation and fit. In this case, the result also gave Tony somewhere fitting to retain a small but important part of the car’s personal story.
17. Preparing for the Journey Home
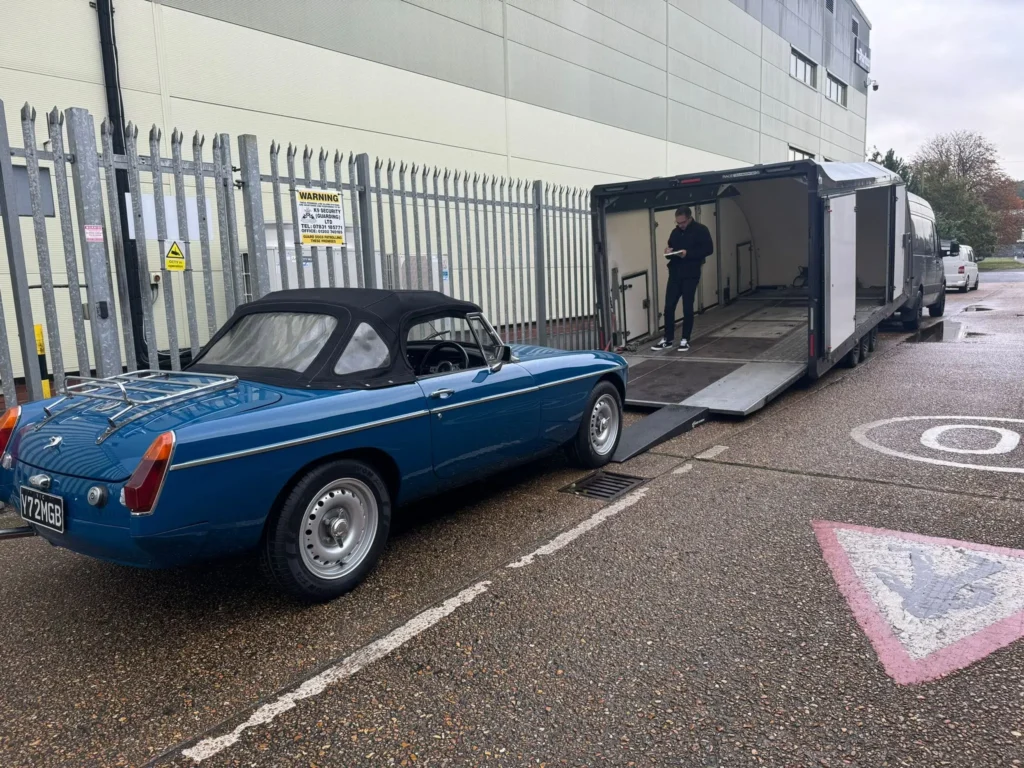
With the restoration complete, the MGB was run, road-tested and thoroughly checked to make sure everything was operating as it should before leaving us.
There was, however, one unusual final task before the car could be loaded for its return to Australia.
As part of the shipping requirements, the engine oil, coolant and fuel all had to be removed. So, after spending so much time getting the car back together and running properly, it went onto the ramp one last time to be drained ready for transport.
Once that was done, the MGB could be loaded into the enclosed transporter and begin the first stage of its journey back across the world.
It was a very different car from the one that had arrived with us from Australia. Then, it had been tired, partially dismantled and accompanied by crates of parts and an engine waiting to be fitted. Now it was leaving as a fully restored, complete and carefully developed 1972 Roadster.
All that remained was for Tony’s MGB to make the long trip home.
18. Back Home in Australia
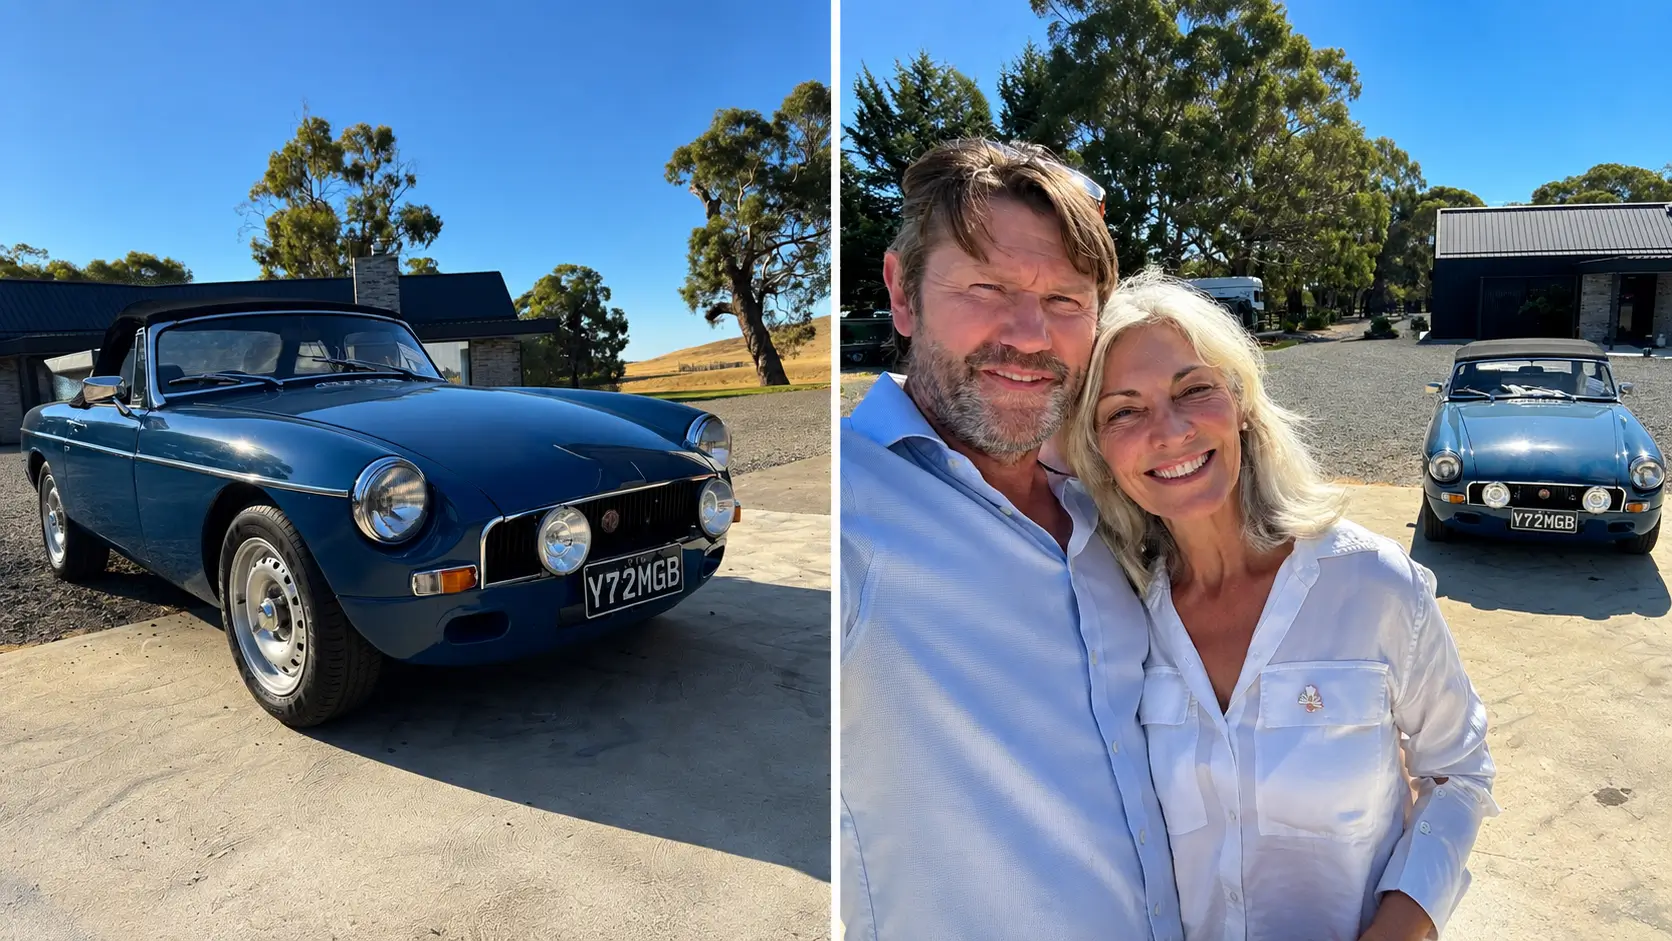
After everything the MGB had been through, there could hardly have been a better way to finish the story than seeing it back in the Australian sunshine with Tony and his partner.
The car had crossed the world twice in the course of this restoration. It had left Australia tired, corroded and in need of major structural work, then returned as the same MGB Tony had owned for so many years — only now rebuilt, protected, upgraded and ready for the future.
That point matters. From the outset, Tony’s priority had been to preserve his own car rather than replace it with a new shell, and that is exactly what the finished MGB represents. The original bodyshell has been saved wherever possible, repaired properly where necessary and returned to its original Teal Blue, while the Sebring-inspired styling and uprated mechanical specification give the car a character all of its own.
 01202 625050
 info@trickettwelding.co.uk